LogoLogo
  • Introduction
  • Features
  • Getting Started
    • Cortex User Guide
      • Organizations
      • Log in
      • Generate an API key
      • Make your first API request
      • Configure the org settings
      • Set up a data model
        • Create custom objects
        • Add custom properties
      • One-to-many relationships
      • Read and write data
      • Making a Request
      • Handling responses
      • Authentication
      • Two-factor authentication
      • Set third-party cookies
      • Connections
      • Upload files
      • Cortex iOS
      • Get started with Swift
      • Cortex service accounts
      • Cortex developer tools
      • Automated Account Notifications
  • Cortex API
    • Overview
    • Objects
      • Objects Overview
      • Organization
      • Account
      • Connections
      • Notifications
      • Stats
      • Logs
      • Export
      • Events
      • Room
    • Object Definition
      • Object Properties
        • Any
        • Binary
        • Boolean
        • Date
        • Document
        • File
        • Geometry
        • List
        • Number
        • ObjectId
        • Reference
        • String
    • Object Types
    • Access Control
    • Querying
      • Query Operators
      • Property Selection
      • Property Access
    • Aggregating
      • Aggregation Operators
    • Scripting
      • Script Types
      • Script Limits
      • ObjectId
      • CortexObject
        • Accounts
        • Views
      • Cursors
      • Operations
      • Script Modules
        • API Module
        • Base64 Module
        • Cache Module
        • Connections Module
        • Console Module
        • Consts Module
        • Counters Module
        • Crypto Module
        • HTTP Module
        • Logger Module
        • Notifications Module
        • Request Module
        • Response Module
        • SAML Module
        • Schemas Modules
        • Script Module
        • Session Module
        • Util.id Module
        • Util.ip Module
        • Util.paths Module
        • XML Module
        • Developer
        • Config
        • Renderer
        • SFTP
        • FTP
        • DB
          • Cursors
          • Driver
      • Static Methods
        • Accounts
        • Views
        • Cursors
      • Audit
      • Environments
      • HTTP Driver
      • Notifications
        • Firebase Cloud Messaging (FCM)
        • Tencent Push Notification Service Configuration
      • Televisit
      • Transforms
      • Localization
      • Available Javascript Libraries
    • Decorators
      • Runtime
        • Acl
        • As
        • Log
        • Profile
      • Static
        • Env
        • Job
        • Object
        • On
        • Policy
        • Route
        • Transform
        • Trigger
    • Expressions
      • Primer
      • Pipelines
      • Operators
      • Accumulators
      • Variables
      • Conditionals
      • Transforms
      • Triggers
      • On
      • Events
    • Faults
      • Fault Reference
  • Releases
    • Cortex Release Notes
      • Cortex API 2.28.3 (R3.4.6)
      • Cortex API 2.28.1 (R3.4.3)
      • Cortex API 2.27.2 (R3.4.1)
      • Cortex API 2.27.1 (R3.3.5)
      • SQL DB Connector 1.3.4 (R3.3.3)
      • Cortex API 2.26.2 (R3.3.1)
      • Cortex API 2.26.1 (R3.2.2)
      • Cortex API 2.26.0 (R3.2.1)
      • SQL DB Connector 1.3.3
      • Cortex API 2.25.0 (R3.1.1)
      • SQL DB Connector 1.3.2 (R3.1.0)
      • Cortex API 2.24.2 (R3.0.2)
      • SQL DB Connector 1.3.1 (R3.0.0)
      • Cortex API 2.24.1 (R2.3.3)
      • Cortex API 2.24.0 (R2.3.2)
      • SQL DB Connector 1.3.0 (R2.3.0)
      • Cortex API 2.23.0 (R2.2.4)
      • SQL DB Connector 1.2.0 (R2.2.0)
      • Cortex API 2.22.2 (R2.1.2)
      • Cortex API 2.22.1 and SQL DB Connector 1.1.1 (R2.0.1)
      • Cortex API 2.22.0
      • Cortex API 2.21.3
      • Cortex API 2.21.2
      • Cortex Web 4.16.0
      • Cortex Web 4.15.1
      • Cortex API 2.20.1
      • Cortex Web 4.14.0
      • Cortex Renderer 1.3.3
      • Cortex API 2.19.4
      • Cortex API 2.19.3 and Cortex Web 4.13.1
      • Cortex Renderer 1.3.2
      • Cortex API 2.19.1
      • Cortex API 2.18.0
      • Cortex API 2.17.6
      • Cortex API 2.17.5
      • Cortex API 2.17.4
      • Cortex API 2.17.3
      • Cortex API 2.17.2
      • Cortex API 2.17.1
      • Cortex API 2.16.0
      • Cortex API 2.15.9
      • Cortex API 2.15.8-1
      • Cortex 2.15.8
      • Cortex API 2.18.1
      • Cortex API 2.16.1
      • Cortex Renderer 1.3.1
      • Cortex Renderer 1.3.0
      • Cortex Renderer 1.2.2
      • Cortex Renderer 1.2.1
      • Cortex Renderer 1.2.0
    • Third-Party License Attribution

© 2025 Medable, Inc. All rights reserved.

On this page
  • Accepting a Connections
  • Auto Accept
  • Creating a Connection

Was this helpful?

  1. Getting Started
  2. Cortex User Guide

Connections

Last updated 3 years ago

Was this helpful?

Connections allow for users of your applications to easily share data. They can be created by a user and can extend access to objects from that user to another.

For example, we have User A and User B. User A has a patient file that they'd like to share with User B. However, User B doesn't have any inherent access to this file.
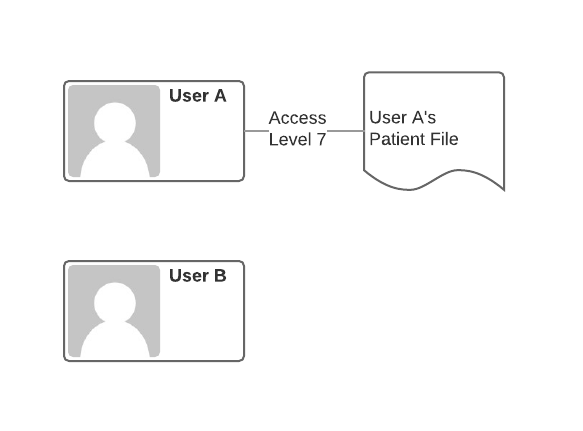
Here User A has the highest level of access to their patient file, Delete access (level 7) because they are the owner of the file. However, User B has no access to the file.

To grant User B access to the file, User A simply needs to create a connection between the patient file and User B and specify the level of access that should be granted.
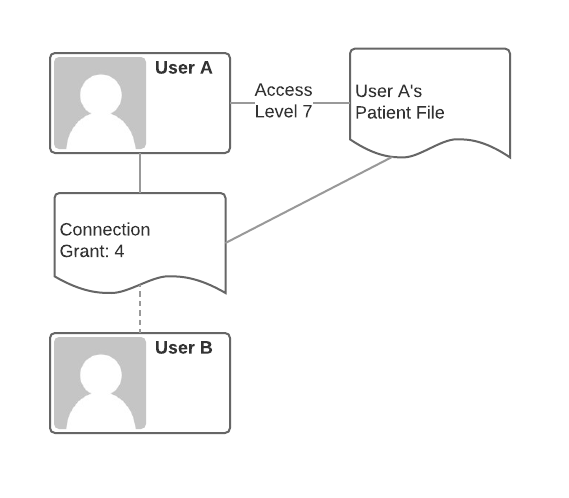
Here the connection is created and User A specifies that Read access (level 4) should be granted to User B.

Through the connection, User B is able to access the file. However, User A has control over User B's access. If User A no longer wants user B to have access, User A simply has to delete the connection.

Accepting a Connections

Retrieve Connections

First find all the connections available to you

GET https://api.dev.medable.com/{{your_org_name}}/v2/connections
{
    "_id": "552419f585b784bc204e73aa",
    "access": 2,
    "context": {
        "_id": "5519c01aae2fd2b02915c81f",
        "object": "c_example",
        "path": "/c_examples/5519c01aae2fd2b02915c81f"
    },
    "created": "2015-04-07T17:55:01.000Z",
    "creator": {
        "_id": "5516ee2634d8d93428169c0e",
        "object": "account",
        "path": "/accounts/5516ee2634d8d93428169c0e"
    },
    "expiresAt": "2015-04-14T17:55:01.032Z",
    "isArchived": false,
    "object": "connection",
    "state": 0,
    "target": {
        "account": {
            "_id": "552417e085b784bc204e737c",
            "object": "account",
            "path": "/accounts/552417e085b784bc204e737c"
        },
        "name": {
            "first": "Charles",
            "last": "Best"
        }
    },
    "token": "u0xJRTlDQD8moTuUqeQiCAaFzU1WPdtq"
}

Accept Connection

Once that token is retrieved, you can accept the connection with a POST utilizing the connection token.

POST https://api.dev.medable.com/example/v2/connections/u0xJRTlDQD8moTuUqeQiCAaFzU1WPdtq
{
    "_id": "552427adccbc32041380264f",
    "access": 4,
    "context": {
        "_id": "5519c01aae2fd2b02915c81f",
        "object": "c_example",
        "path": "/c_examples/5519c01aae2fd2b02915c81f"
    },
    "created": "2015-04-07T18:53:33.000Z",
    "creator": {
        "_id": "5516ee2634d8d93428169c0e",
        "object": "account",
        "path": "/accounts/5516ee2634d8d93428169c0e"
    },
    "isArchived": false,
    "object": "connection",
    "state": 1,
    "target": {
        "account": {
            "_id": "552417e085b784bc204e737c",
            "object": "account",
            "path": "/accounts/552417e085b784bc204e737c"
        },
        "email": "charles+best@example.org",
        "name": {
            "first": "Charles",
            "last": "Best"
        }
    }
}

📘Note

The state of the connection is now "1" or "Active"Auto-Accept

Auto Accept

Automatically Applying Connections

In some scenarios, it may be necessary to create connections without the target needing to accept the connection. This is possible if the following apply:

  • The context object is not an Account

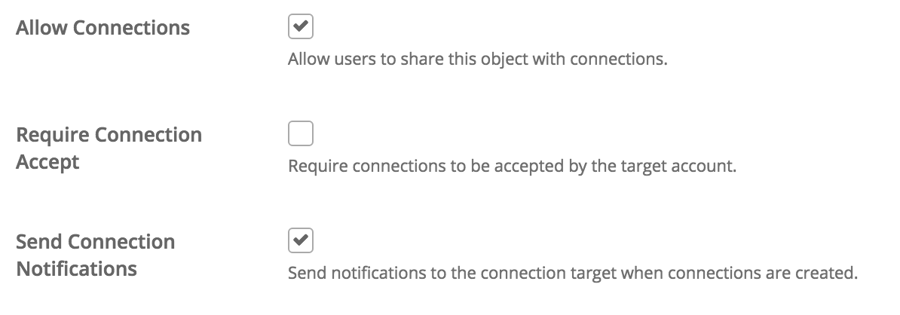
  • The context object does not require connection acceptance

  • The target is already a registered user and the account _id is used in the target instead of email

  • "auto":true is sent in the connection target

Optionally you can uncheck Send Connection Notifications to prevent notifications from going out when connections are created as well.

Automatically applying a connection is then very much like creating a connection like above but with "auto":true added to the target.HTTP

POST https://api.dev.medable.com/example/v2/c_prescriptions/576967021d0c03a53cd79fd7/connections

Request Body

{
   "targets":[
      {
         "object":"account",
         "_id": "552417e085b784bc204e737c",
         "access":4,
         "auto":true
      }
   ]
}

JSON Response

{
    "data": [
        {
            "_id": "576967441d0c03a53cd7a028",
            "access": 4,
            "context": {
                "_id": "576967021d0c03a53cd79fd7",
                "object": "c_prescription",
                "path": "/c_prescriptions/576967021d0c03a53cd79fd7"
            },
            "contextSource": null,
            "created": "2016-06-21T16:11:48.800Z",
            "creator": {
                "_id": "575f58281d0c03a53ccc3ac6",
                "object": "account",
                "path": "/accounts/575f58281d0c03a53ccc3ac6"
            },
            "expiresAt": "2016-06-28T16:11:48.802Z",
            "object": "connection",
            "state": 1,
            "target": {
                "account": {
                    "_id": "552417e085b784bc204e737c",
                    "object": "account",
                    "path": "/accounts/552417e085b784bc204e737c"
                }
            }
        }
    ],
    "hasMore": false,
    "object": "list"
}

📘Note

The connection is immediately created in state "1" or "Active" without any acceptance needed.

Creating a Connection

To create a connection you need

  1. The context: An object instance you'd like to share

  2. The targets: A target user or team of users you'd like to extend access to

A connection can have multiple targets, so an array of targets is sent when creating the connection. A target takes the form of:JSON

{
    "object":"account",
    "email":"fred.banting@example.org",
    "name":{
        "first":"Frederick",
        "last":"Banting"
    },
    "access":4
}

For an individual target if you have only an email address. In cases when you only have the account id, you can also pass in:JSON

{
    "object": "account",
    "_id": "575f58281d0c03a53ccc3fd3",
    "access":4
}
  • When inviting an individual, object will always be "account".

  • Then, either email or _id of the account must be sent. email is useful for inviting individuals when the account _id is either not known or if the individual does not yet have a user account. If a user with that username exists in the org, the user account will automatically be used. If using email you can optionally specify the name as illustrated above. This can be useful in connection notification templates. For example, you can send personalized emails with the recipient's name included in the message.

  • access is the level of context access you are granting to the target.

Creating a connection is a matter of calling a route with the following pattern:HTTP

POST https://api.dev.medable.com/{{your_org_code}}/v2/{{object_name}}/{{object_id}}/connections

Where your_org_code is the org code you specified when signing up. object_name is the plural name of the object you are creating a connection to and object_id is the _id of the object instance that you are creating a connection to.

Here's an example on a c_prescription instance:HTTP

POST https://api.dev.medable.com/example/v2/c_prescriptions/576967021d0c03a53cd79fd7/connections

Request Body

{
   "targets":[
      {
         "object":"account",
         "email":"fred.banting@example.org",
         "name":{
            "first":"Frederick",
            "last":"Banting"
         },
         "access":4
      }
   ]
}

JSON Response

{
    "data": [
        {
            "_id": "576967441d0c03a53cd7a028",
            "access": 4,
            "context": {
                "_id": "576967021d0c03a53cd79fd7",
                "object": "c_prescription",
                "path": "/c_prescriptions/576967021d0c03a53cd79fd7"
            },
            "contextSource": null,
            "created": "2016-06-21T16:11:48.800Z",
            "creator": {
                "_id": "575f58281d0c03a53ccc3ac6",
                "object": "account",
                "path": "/accounts/575f58281d0c03a53ccc3ac6"
            },
            "expiresAt": "2016-06-28T16:11:48.802Z",
            "object": "connection",
            "state": 0,
            "target": {
                "email": "fred.banting@example.org",
                "name": {
                    "first": "Frederick",
                    "last": "Banting"
                }
            }
        }
    ],
    "hasMore": false,
    "object": "list"
}

The above created a connection with fred.banting@example.org to the c_prescription instance with _id 5519c01aae2fd2b02915c81f. But notice that the state of the connection is "0" of "Pending". This is because it has not yet been accepted by Mr. Banting.

Mr. Banting would then receive an email notification at fred.banting@example.org notifying him that John Smith at NewHealthCo would like to share a Prescription file. Once Fred registers as a user, he can then accept or decline the connection. If accepted, Mr. Banting would have Read access to the c_prescription (level 4).

Once in place, User B now has access to the patient file and is able to read it.
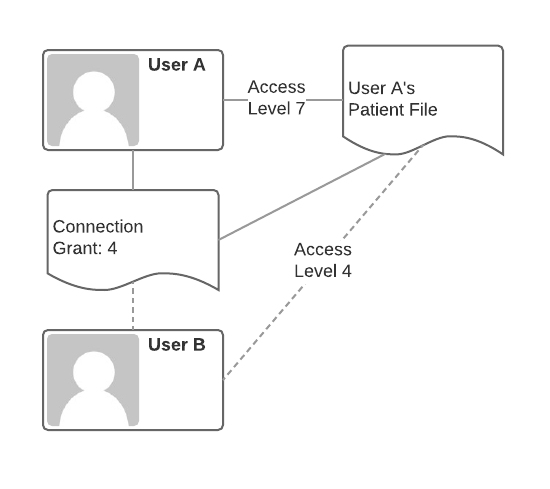
For all of the access levels, see in the API documentation.

To configure your object to not require connection acceptance, when creating your object or editing your object settings, be sure that Require Connection Accept is unchecked.
For more details on the connection object, it's properties, and available API routes, see

Access Control
Apply Connection