Get started with Swift
iOS SDK for Medable provides a wrapper for the Medable RESTful API as well as several helper tools to directly integrate those features to your iOS application.
The Medable iOS SDK is targeted to be used in apps that have a base SDK of iOS 7+ and the following instructions are targeted for Xcode 6+ users. Please consider updating if you have an older version.
To see the github repo for the Medable iOS SDK, click here.
The following articles how to get started quickly with Medable using Swift 3 and Xcode 8.
This tutorial shows one way to quickly get started using a new or existing Swift iOS project. Before you begin, you should have generated an API key. If not, do this first.
Create your Swift Project
In Xcode, select File > New Project...
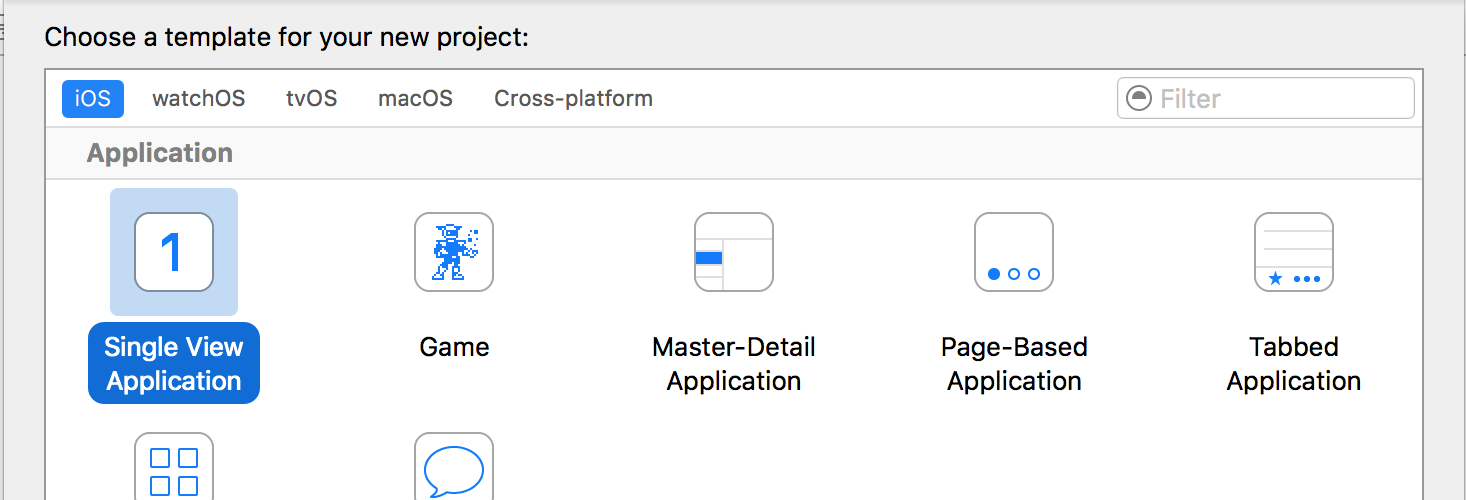
Select Single View Application and click next.
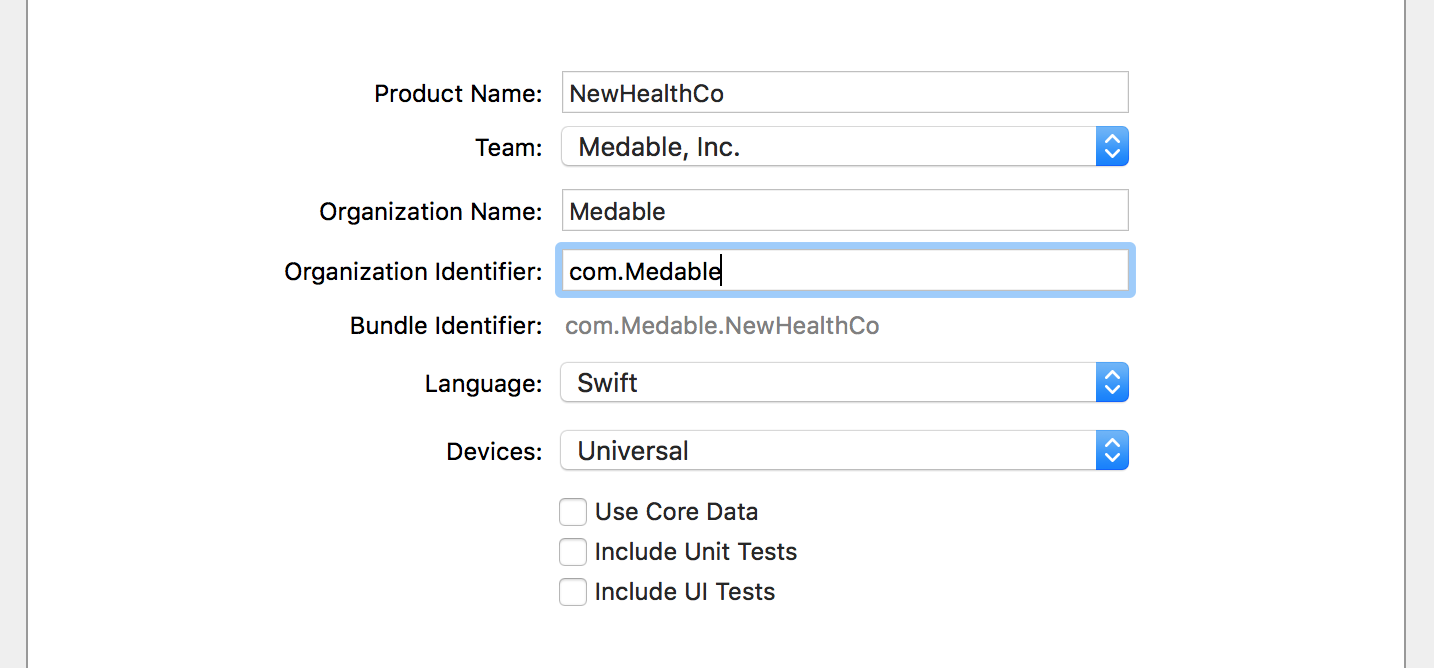
Enter your project details. For this tutorial, we'll call the app "NewHealthCo"
Install Medable Cortex iOS SDK
Integrate the SDK following the integration instructions from the README.md file in the SDK repository.
Initialize Medable
Add the Medable start function to your AppDelegate and set the logger level to Debug so you can see more detailed network responses in the console. Swift
Then build and run the app
The app shows a blank screen but you should see proper console outputs
Integration Complete
You've successfully connected to your Medable HIPAA compliant backend. You're ready to collect PHI.
Great, we've got our New Project setup and we're ready to rock and roll.
This tutorial will make use of the Account Registration route which is disabled by default in your Organization Settings. You'll want to enable registration under Settings > Organization in order for it to work. See Configuring Org Settings for more details.
Account registration boils down to one function
This function takes in a number of default parameters to initialize the Account object with. But only five of them are required
First Name
Last Name
Email
Password
Mobile Number
Optional parameters include gender, dob, profile image, and role.
Here, we'll show you how to create a basic registration form using Swift and Interface Builder. At the end we provide a zip file containing the final result of this step-by-step tutorial.
Create Registration Form
Open Interface Builder (IB) by opening
Main.storyboardDrag a Navigation Controller into IB and set it as the initial view
Set the table view Content setting to Static Cells
Drag a UITextField into a static cell with proper struts and springs
Replicate this static cell for each field you'd like to collect in this form
Associate an IBOutlet for each text field
Drag a UIBarButtonItem into the top bar and call it "Submit"
Associate an IBAction called "submitPressed" with the "Submit" button
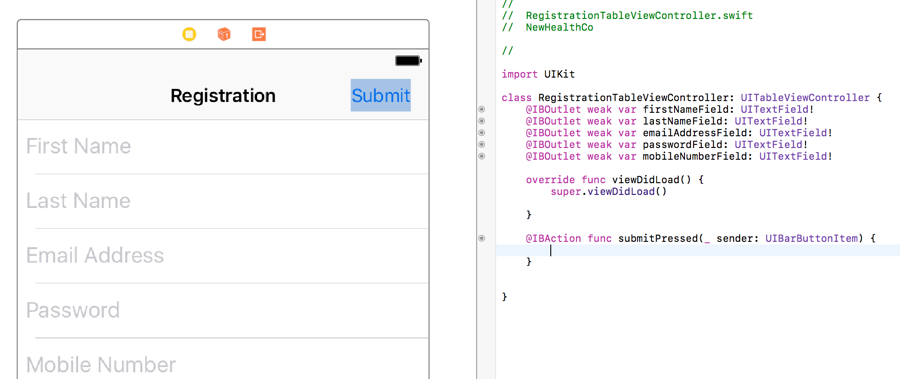

Build and Run to make sure that you can see the form and all its placeholder values.
Register Account
Add one function to the submitPressed function to make the form create a user in your database.
This function simply passes in all data entered into the form as parameters for the registration function. As an example, let's suppose we input the following into our simulator: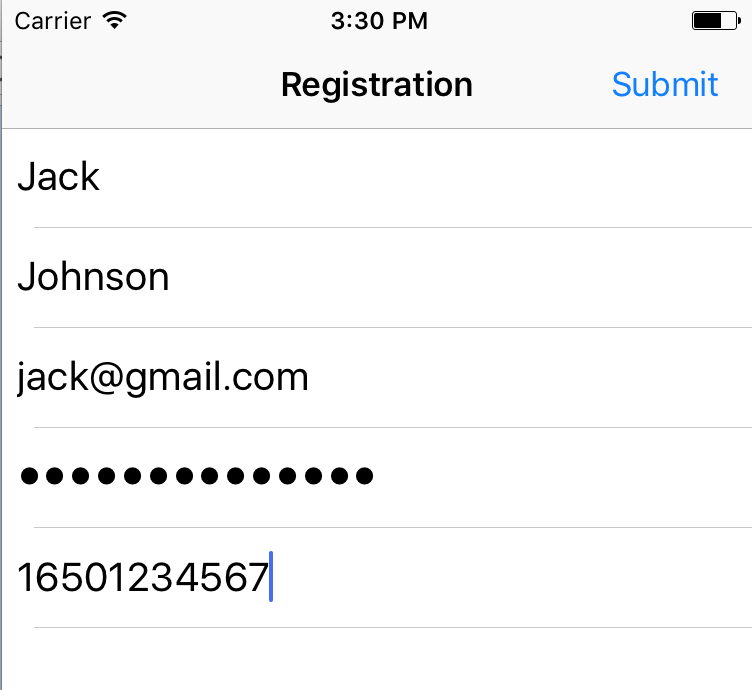
Submit the registration form and let's see what we get in the console:
We got a validation error because our password strength isn't high enough.
Medable uses the zxcvbn password strength estimator to evaluate how strong a password is
You set the minimum password strength in your org settings. The default minimum is
Good, which which maps to 2 on the 0-4 on the zxcvbn scale. We strongly advise against lowering this minimum.

Password Validation
It would be fantastic if we could immediately know whether a password will be strong enough before making an API call. Luckily, there's an open-source library that allows us to do just that.
Add the zxcvbn-ios pod to your Podfile
Install dependencies by running
pod installon your terminalOpen
RegistrationTableViewController.swiftandimport zxcvbn_iosat the topMake
RegistrationTableViewControllera delegate for the password text fieldDrag a UIView next to the UITextField for the password
Set this UIView to a Custom Class called DBPasswordStrengthMeterView and drag as an IBOutlet into the controller

The final step is to implement the UITextField Delegate function so that each change in the password field is given a new strength indicator
Build and Run
I've turned off secure text entry to show that the meter does indeed adjust to the complexity of the password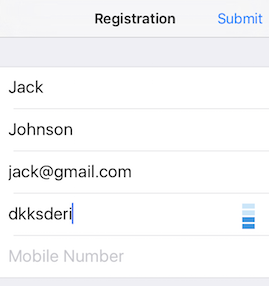
We want to be sure that when we submit the form, the password strength is at least as strong as our org setting minimum. The default minimum is 2 (Good). The lowest is 0 (Weakest). Add the following lines to the submitPressed function before calling register.
Now our password validation happens locally before making any network calls and our user isn't left guessing a million different passwords hoping they'd meet the minimum strength requirement!
Mobile Number Validation
Another type of error you might get when trying to call register is kInvalidPhoneNumberFormat. This means the entered mobile number is probably not a real number. Medable uses Google's phonelib to validate numbers.
Let's use the iOS version of phonelib to check that a number is valid before making an API call
Add the libPhoneNumber-iOS pod into your Podfile and
pod installin the terminalOpen
RegistrationTableViewController.swiftandimport libPhoneNumber_iOSat the topAdd the following lines to the
submitPressedfunction before calling register.let phoneUtil = NBPhoneNumberUtil() do { let myNumber = try phoneUtil.parse(mobileNumberField.text!, defaultRegion: "US") if !phoneUtil.isValidNumber(myNumber) { return } } catch let error as NSError { print(error) }
We first define the util that will parse and validate the user's mobile number. To test this, run the app with an obviously invalid phone number like 12223334444 and the function should return with an error in the console without calling register.
Note: the mobile number must be formatted with the country code included or it will be marked as invalid and registration will fail.
Registration Complete
You now have a registration form to sign up new users!
We've finished Registration and now it's time to allow registered users to log back in. First, add screens to the IB for login.
Interface Builder Setup

Link the form fields and submit button actions just as we did for the registration view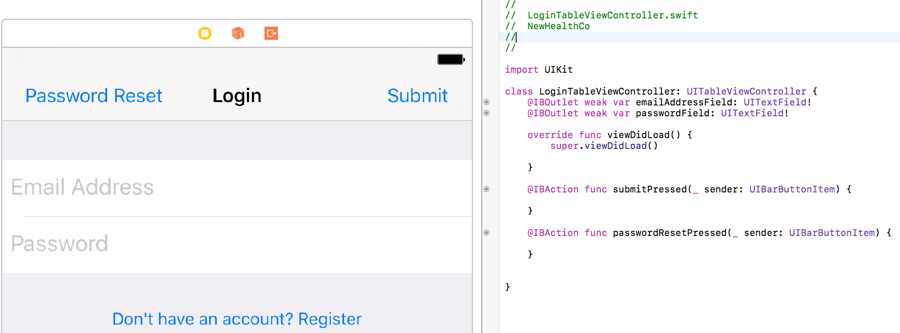
Logging in is done through the function .authenticateSessionWithEmail... which takes in 4 parameters
Email
Password
Verification Token - this is an optional parameter that you only set when the user is using 2fa to verify his/her identity
Single Use - having this set to
falsetells the Medable SDK to remember the current device for all future login attempts so that 2fa is no longer required for this specific account on this specific device
If you attempt to login on the same iOS simulator or device that you used for registration, the authentication should succeed without a verification token.Swift
Login Auth Response
Attempting to authenticate a user results in three common scenarios
Successful Login
Two-factor Authentication Required
For security reasons, Medable enforces two-factor authentication. Learn more here
To test this you simply register an account on one simulator/device and try to login to that same account on a different version simulator or different device. Alternatively, you could delete the app between registration and installation.
Or, if the user was already sent a verification code but still tries to login without passing in a verification code
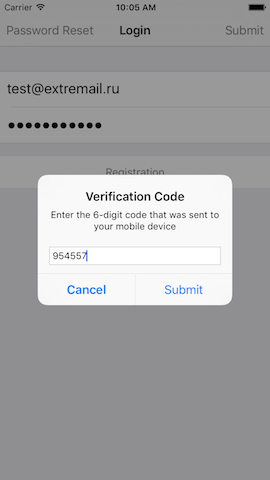
So if the callback returns either of these error messages, we prompt the user to enter the 6-digit verification code that Medable automatically sends to the mobile number associated with the account (via SMS).
Create an instance of UIAlertController to collect this information and call authorize again with the code passed in as a parameter (instead of nil)
Invalid email/password combination
For security reasons, the Medable API will never indicate whether the email doesn't exist in the database or the password was incorrect for an existing email. Instead the API simply accepts or denies a given combination of email/password.
Add a "Reset Password" button to the tab bar and corresponding IBAction
When the button is pressed, we present a UIAlertController once again to collect the email address that the user is trying to login with.
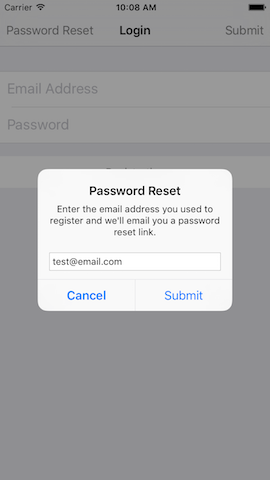
Here's the setup code for the two UIAlertController.
Swift
Login Complete
Once login is successful, the Medable.client().currentUser object is defined for you to access details regarding the logged-in user from any file in the project.
In this tutorial, we'll demo the built-in push notification feature of Medable. The setup involves a 4-step configuration:
Generate PEM file
Enable Medable Push Notifications
Send Medable Push
Xcode Setup
Generate PEM file
Start by navigating to developer.apple.com
Go to "Certificates, Identifiers & Profiles" -> "Identifiers" -> "App IDs"
Select your app ID -> Click Edit -> Enable Push Notifications -> Under Development SSL Certificate, Click Create Certificate
Follow Apple's instructions to create a certificate named Apple Development IOS Push Services: APP ID HERE in your Keychain Access app
Right click on this certificate and select the export option.

Name it something like MedableDevPushCertificate -> Change format to .p12 -> Click Save
If you don't see the .p12 option in the dropdown, navigate to the "Certificates" section in the left navigation and right click on the certificate from there
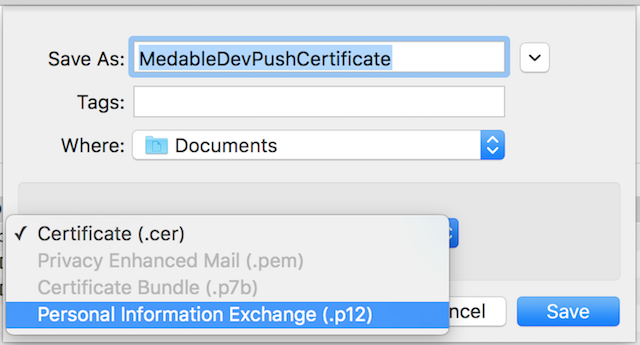
It will prompt you to enter a password - DO NOT enter any password - simply click OK with the fields empty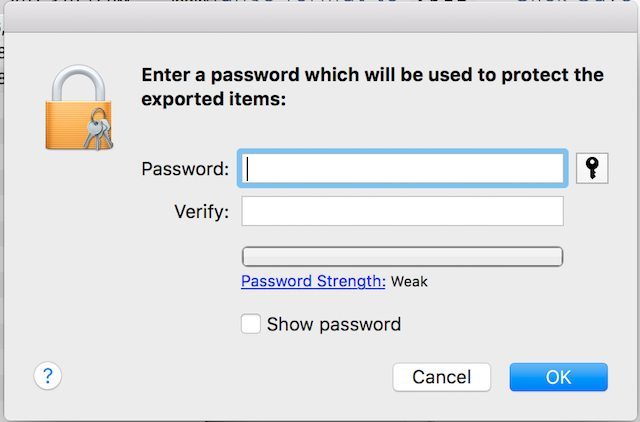
Open Terminal -> cd into the folder that contains MedableDevPushCertificate.p12 -> copy paste the following command
🚧IMPORTANTDO NOT enter a password when prompted after issuing the above command in the terminal - just press enter to continue
Open MedableDevPushCertificate.pem in the text editor of your choice, from the Terminal or Finder
You should see a bunch of mumbo jumbo clearly delineated by -----BEGIN CERTIFICATE----- and -----END CERTIFICATE----- and -----BEGIN RSA PRIVATE KEY----- and -----END RSA PRIVATE KEY-----
Congrats! Part 1 is done. But keep this .pem file open - we'll be copy pasting some of this into your Medable App Settings
If you're having trouble getting to this point, there's a more detailed guide here if you scroll down to "Creating an SSL Certificate and PEM file"
Enable Medable Push Notifications
Go to your Medable Admin Portal- app.dev.medable.com/
Settings => Apps => Select your app
Check
APNs Debug Gateway Option- only do this if you're inputting a development certificate.Copy everything from begin certificate to end certificate (including markers) into the
APNs CertificatefieldCopy everything from begin RSA private key to end RSA private key (including markers) into the
APNs Private Keyfield
Send Medable Push
Remember that in this example, we'll be sending a push notification once a user logs in successfully. Create a trigger script to achieve this behavior.
Create a custom notification by going to Settings -> Notifications -> Custom Notifications -> New Notification
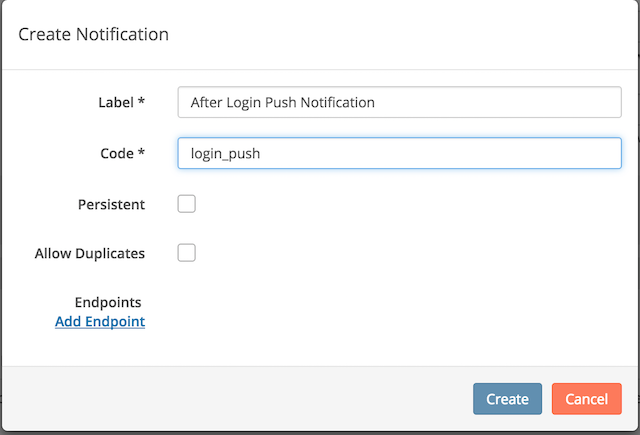
Click Add Endpoint
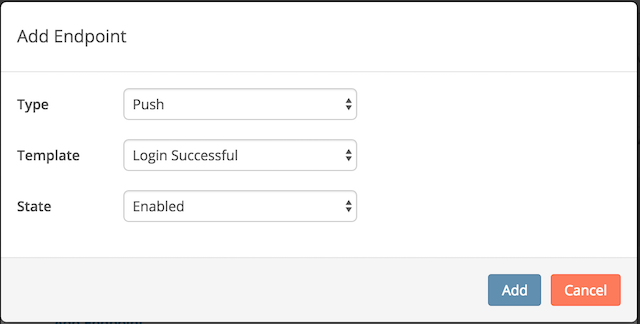
By the way, I selected a custom Login Successful template I created in the Settings -> Templates tab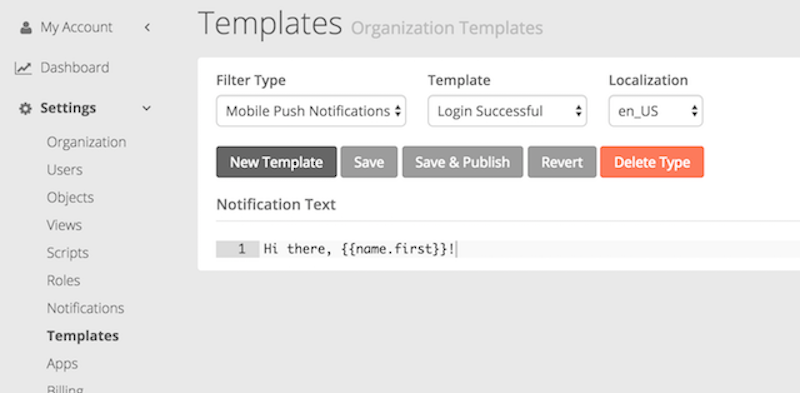
Create the custom notification with the Push Notification Endpoint and now you can send trigger this notification in your custom script.
Go to Settings -> Scripts -> New Script
Create a trigger than runs upon Account login
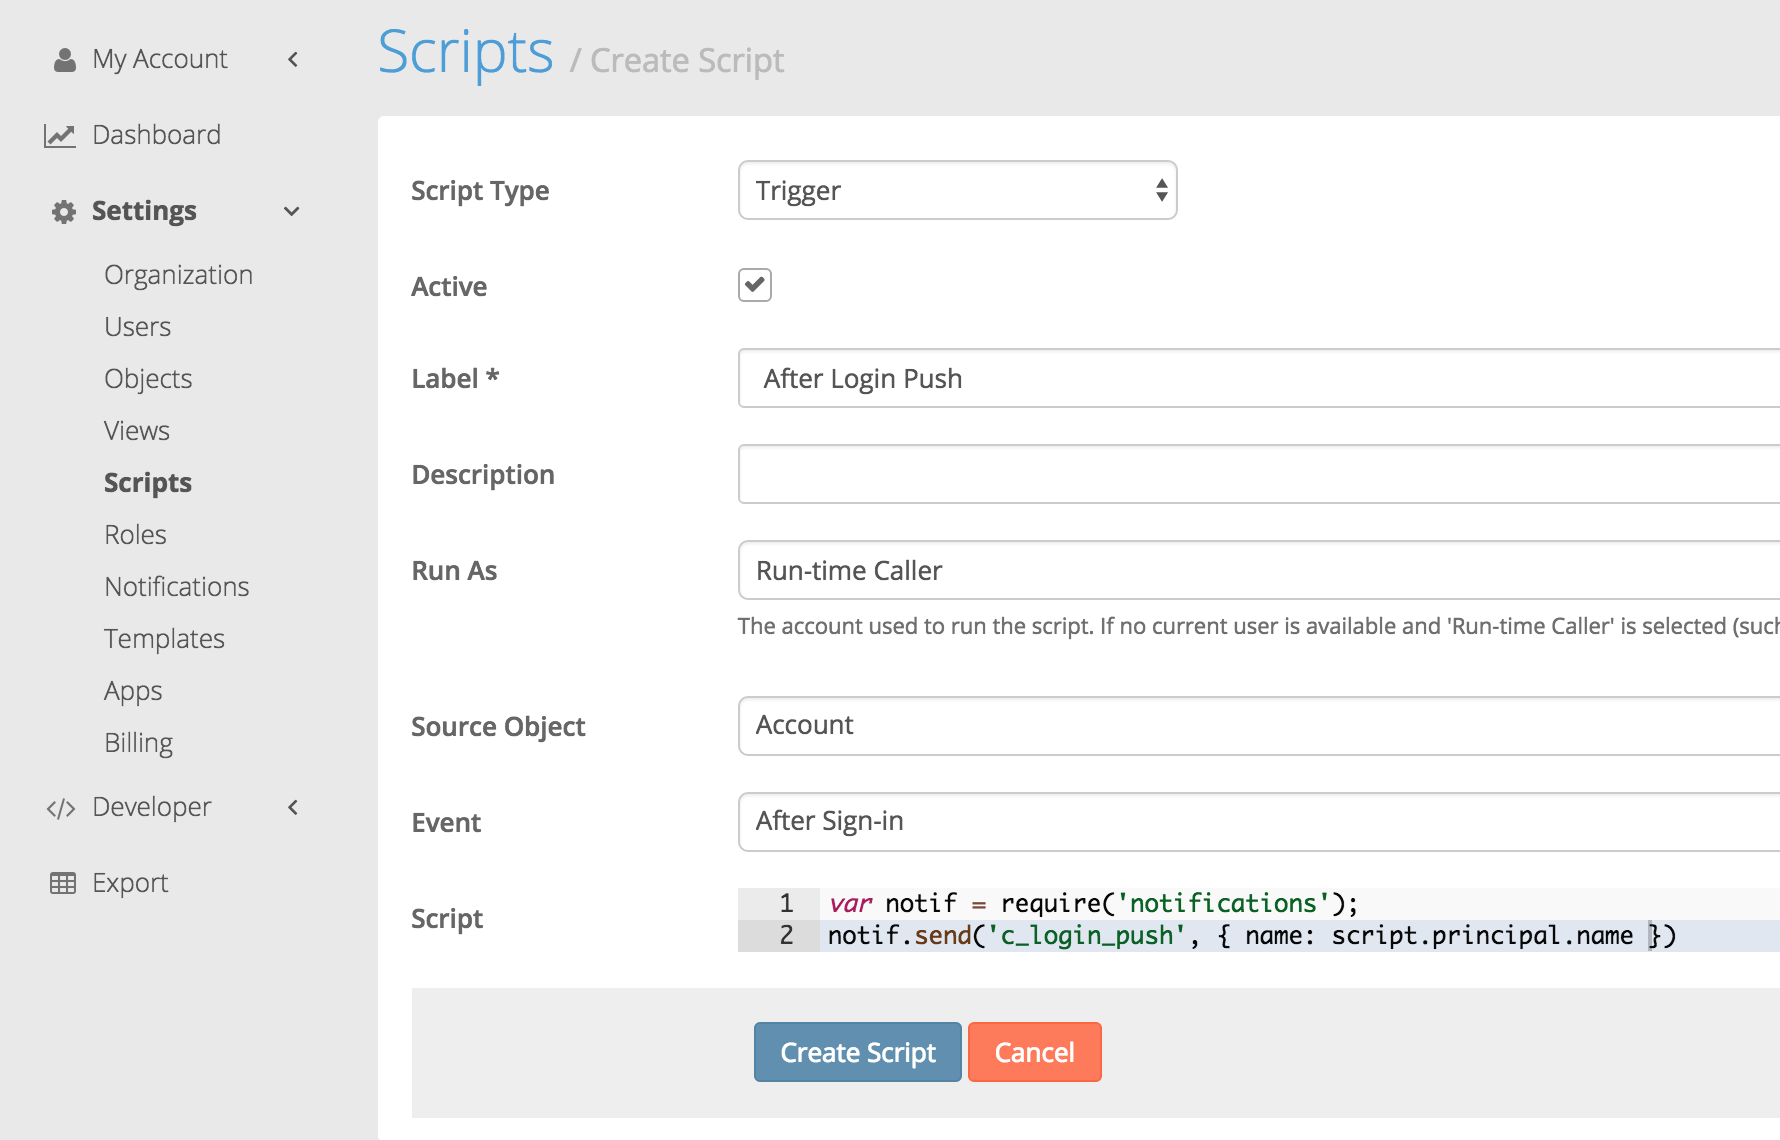
The notification code corresponds to the custom notification we created. The name set to the principal's name in order to be able to use it in the notification template to personalize the message with the receiver's name. A third parameter can be set in the notif.send() function to specify who gets the push notif. But if not, it will default to whoever is the run-time caller.
Xcode Setup
Xcode 8 makes it easier than ever to enable push notifications on your project. If you followed instructions correct to this point, you shoud just be able to switch on Push Notifications in the Capabilities section of your project settings.

Now navigate to your Project Settings and uncheck the Automatically manage signing option. We'll upload a provisioning profile specific to this app instead. We didn't cover how to get a provisioning profile from the apple dev center but you can find instructions on how to do this from other online resources.
Ensure that your device is registered under this provisioning profile. This is done by going to developer.apple.com -> Devices -> click + button -> specify name and UDID of device -> click register. Then select this device when creating your provisioning profile.
Setting up your application to receive push notifications is simple. Just a few more lines of code to our existing tutorial project that already has registration and login built in.
In the App Delegate after application has launched, let's request permission from the user to send push notifications
In order for UNUserNotificationCenter to function, we need to
import UserNotificationsat the top of the AppDelegate
Once permission is granted, let's send the device token to Medable so the system knows where to send the push notifications.
If the push notification is received while the user isn't using the app, the device will show the alert text on the lock screen or as a popup banner. But if the user is in the app, a separate AppDelegate function gets called:
Run the app and login. In seconds, you'll receive a push notification logged in your console. Lock your device, login from the web console and you'll see the push notification show up on your device's lock screen.
First Push Notification Successful
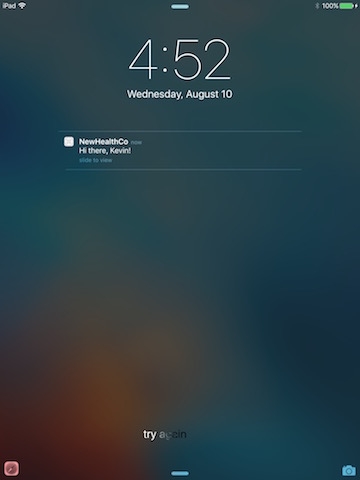
Nice job!
Last updated
Was this helpful?