Cortex iOS
About the SDK
Welcome to the iOS Client SDK for Medable. This framework provides a wrapper for the Medable API as well as several helper tools to directly integrate those features to your iOS application.
For basic integration and initialization steps, check the README.md file in the SDK repository.
Examples
Check out the Code Samples for a few examples on how to get some specific things done with the Medable SDK. This tutorial shows one way to quickly get started using a new or existing Swift iOS project. Before you begin, you should have generated an API key. If not, do this first.
Create your Swift Project
In Xcode, select File > New Project...
``
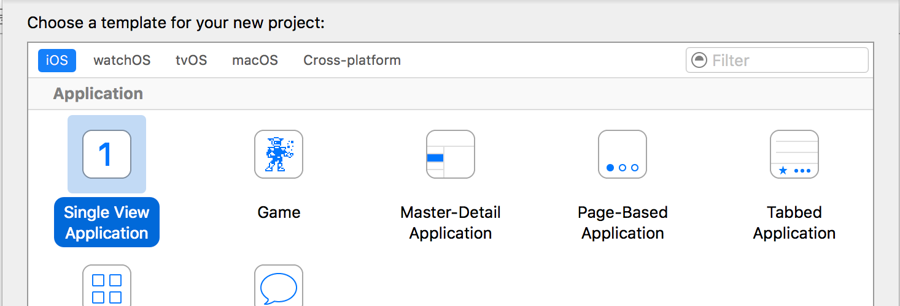
Select Single View Application and click next.

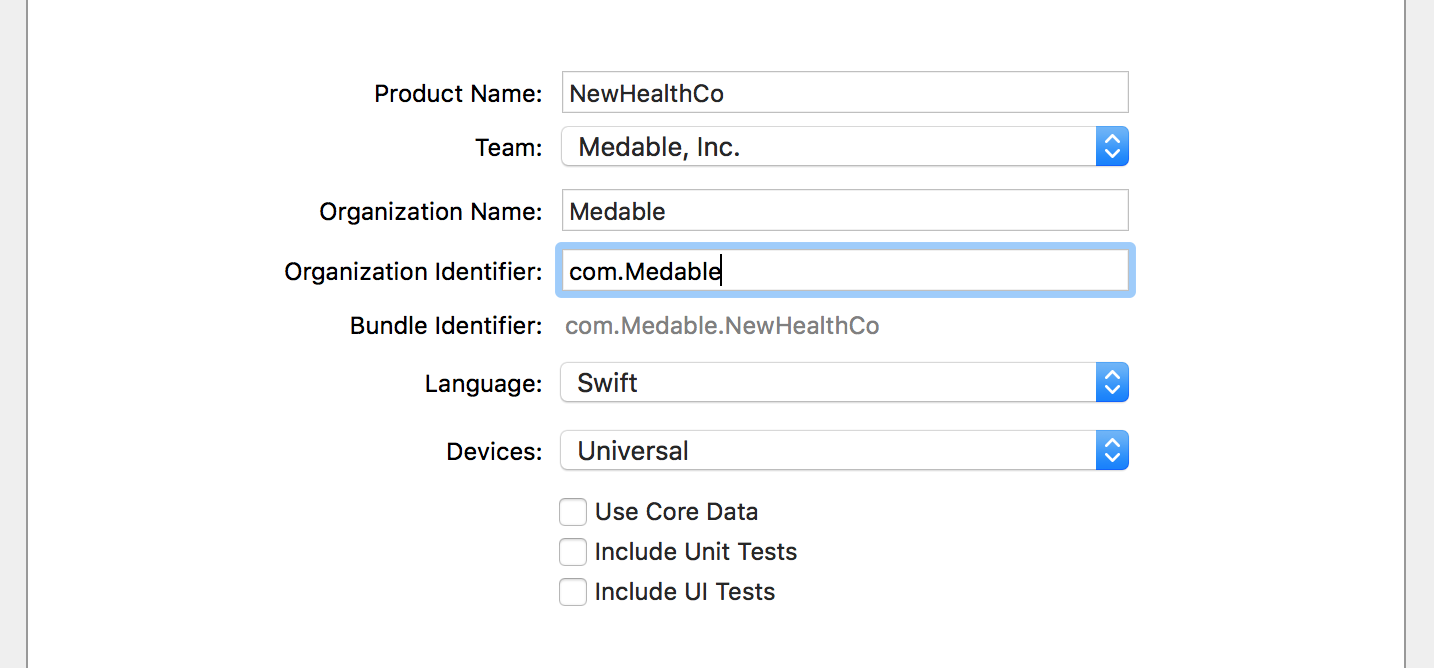
Enter your project details. For this tutorial, we'll call the app "NewHealthCo"
Install Medable Cortex iOS SDK
Integrate the SDK following the integration instructions from the README.md file in the SDK repository.
Initialize Medable
Add the Medable start function to your AppDelegate and set the logger level to Debug so you can see more detailed network responses in the consoleSwift
Then build and run the app
The app shows a blank screen but you should see proper console outputs
Integration Complete
You've successfully connected to your Medable HIPAA compliant backend. You're ready to collect PHI.
Pagination Helpers
When working with lists, it is often important to page through results. The recommended approaches to working with lists through the API are outlined here.
However, the Cortex iOS SDK makes this quite simple with pagination helpers.
The following examples illustrate how to paginate through a list of c_prescription instances.
For information on how to create custom cortex objects such as the example c_prescription object, see Data Model Setup.
For more information on working with your Cortex Objects in iOS, see Cortex Objects.
1. Using the Pagination Helper
This is how an instance of MDPaginationHelper is created and initialized:
Objective-C
If you use the delegate approach, don't forget to conform to the MDPaginationHelperDelegate protocol,
Objective-C
and implement the delegate methods to get the results:
Objective-C
Both delegate methods are marked as optional. If you don't implement the didLoadAllResults, and loadAllPages is called, you'll get all the results in the first method, together with the results from calling loadNextPage. So, if you need to get the results of both calls separately, implement both.
📘NoteThe delegate approach and the results callback approach can be used simultaneously.
📘NoteYou'll find documentation about
cacheResultsandinverseOrder, as well as for some other pagination options (e.g. list property pagination, or paging using a field other than_id), in theMDPaginationHelper.hheader file.
2. Using the Pagination Manager
If you don't want to manage the instances of MDPaginationHelper, you can leave that to the MDPaginationManager. Just create the instances using the MDPaginationManager class. Let's achieve the same as before; the only difference relies in how you create the instance:
Objective-C
Later on, that paginator's instance can be retrieved by doing this:
Objective-C
If you don't need to retrieve the pagination helpers by identifier, but you still want the manager to take care of storing them; there is a function to generate random identifiers:
Objective-C
Code Samples
Login
Objective-C
Logout
Objective-C
Register User
Objective-C
Create Object
Let's suppose we are using a custom Prescription object definition that was created using the Data Model Setup guide.
Now, we want to create instances of those objects using Cortex from the client side. Objective-C
Edit Object
Let's suppose we are using a custom Prescription object definition that was created using the Data Model Setup guide.
Now, we want to edit an existing instance of that type of object using Cortex from the client side. Objective-C
List Objects
Let's suppose we are using a custom Prescription object definition that was created using the Data Model Setup guide.
Now, we want to list existing instances of that type of object using Cortex from the client side.
📘NoteFor paginated listing take a look the Pagination Helpers guide.
Objective-C
📘NoteIf you need to use a custom class instead of
MDObjectInstanceand want Cortex to return instances of your class instead, follow the Cortex Objects guide.
Delete Object
Objective-C
File Download
Files can be downloaded using one of two methods.
Using a download path: Objective-C
Or using a MDFacet of the File.
Objective-C
File Upload
File uploads are a two step process as described in the File Uploads documentation.
In the first step, a file property name and the file name is sent to the server. This could happen when creating an object and also when editing an object.
In the response of the first step, that is, in the callback of whichever method was used in step 1 --create or update; is when the actual file upload takes place using upload information sent by the Cortex API.
For this sample, let's suppose we are creating an instance of a c_anObject object type that, has a c_image File property. We want to upload an image to the content facet of that File.
Objective-C
📘File UploadsFor a deeper management of file uploads take a look at the Managing File Uploads documentation.
Managing File Uploads
The Medable Cortex iOS SDK features an upload operations manager, that takes care of the following tasks:
Keep an up to date list of ongoing upload operations.
Keep an up to date list of recently successfully completed operations.
Keep an up to date list of recently failed operations.
Keep a progress value (percentage expressed in the 0..1 range) for each operation.
Emit notifications for every change in the manager: - Newly added upload. - Upload completed or failed. - Upload operation progress changed.
Notifications
Every time there is a significant event in the upload operations manager, it emits a notification using the string kOperationProgressChangedNotification, which is declared in MDUploadOperations.h:
Objective-C
As expressed in the comment, this notification is emitted for every change in the upload operations manager.
How to listen the notifications: Objective-C
How to handle the notifications: Objective-C
Within the notification, depending on the event, two different objects could be sent:
A
MDUploadOperationobject is delivered inside theNSNotification.objectproperty if it is notifying about upload progress. See below for more info.A
MDUploadOperationsobject is delivered inside theNSNotification.objectproperty if it is notifying about the following events:A new
MDUploadOperationwas added to the queue.A
MDUploadOperationsucceeded.A
MDUploadOperationfailed.A
MDUploadOperationwas removed from completed/failed.Flushing operations. Flushing ongoing, succeeded and failed queues.
State
The state of all upload operations can be queried from the MDUploadOperations class by checking the the following class methods:
Objective-C
An ongoing operation is an upload task that is still uploading, i.e. it hasn't failed and it hasn't completed the upload yet.
Recently completed operations are short lived. After completion, the operation objects will stay in this list for at least 10 seconds. After this time, they'll be removed from the list.
Recently failed operations live a little longer. After failing, the operation objects will stay in this list for at least 1 minute. Again, after this time, they are be removed from the list.
Each operation is an instance of class MDUploadOperation. Here are some interesting features they provide:
Progress: Use the
progressNumberattribute to determine the progress percentage (measured in the 0..1 range) of the upload operation.Data Task: Use the
operationproperty, of classNSURLSessionDataTaskfor the data task that the operation is using. You may callcancelon this object to cancel the upload.File Name: If you are uploading several things at once, the
fileNameproperty contains the name of the file being uploaded.NSProgress: Apple's
NSProgressclass allows for fine grain progress reporting, theoperationProgressproperty returns the associatedNSProgressobject with this upload operations.
Cancel an Ongoing Operation
To cancel an ongoing operation, just call cancel on its data task, which you get from calling operation on the MDUploadOperation instance.
Here is code to cancel an ongoing operation: Objective-C
Retry a Failed Operation
Any operation that has failed can be retried, it need not be in the failed operations set, but beware that the upload tokens used will eventually expire.
Here is code to retry an operation currently in the failed set: Objective-C
Migration Guide
If you're upgrading from a previous version to 1.10 or newer, you will need to make the following changes:
Remove the Medable framework from the Xcode project.
Following the installation guide, update to the latest version.
Replace any instance of
Medable/Medable.hwithMedableCortex/MedableCortex.h
Last updated
Was this helpful?